My First Bariatric Thanksgiving
I have prepared Thanksgiving Dinner for my
family for the past 15 years only taking one year off to celebrate at my brother-in-law's house. I have always gone all out on the holidays because we always had the family over. I have to admit I have been a little nervous about my menu choices this year. Was I going to have to make to dishes of everything. One for me and one for everyone else. Talking to my hubby about it the other day he told me to fix everything so that I would be able to eat it. Well then came the task of building my menu that I could also eat. I always like to stick to the same menu or at least a close version.
My Thanksgiving menu
*Turkey
*Baked Ham
*Green Beans
*Broccoli Casserole
*Baked Macaroni and Cheese
*Corn on the Cob
*Loaded Mashed Potatoes
*Sweet Potato Casserole
*Stuffing
*Rolls
*Deviled Eggs
* Turkey Gravy
* beef Mushroom Gravy
* Strawberry Dump cake
* Pumpkin Pie
*Pecan Pie
This year I know I will be eating a whole lot less and will have to pass on the sweet (which I don't mind because I'm keeping my eye on the prize) I have been doing a lot of searching for recipes that aren't to far from what I have been preparing in past years and have decided to share that wealth with others. If your wondering what you may fix this year feel free to try these recipes.
This simple twist on Roast Turkey 101 will produce a Moist & Juicy platter of tender meat that you will actually be able to eat.
The concept of roasting your turkey breast side down is ideal for bariatric eating as all of the juices from the fattier dark meat continuously baste the breast meat while roasting - the white meat is protected from harsh heat while the dark meat is exposed and cooked at a higher temperature. The reality is the best you have ever served.
Find that giant platter that you never use - you will need it for your amazing yet easy presentation and get ready for applause from guests as if Martha Stewart had cooked their meal.
3 stalks celery, sliced
1 large onion, diced
1 apple cut into wedges
2 carrots, sliced
Sprigs of fresh thyme, sage, and rosemary – sold labeled as ‘poultry herbs’
Fresh turkey, washed and dried – calculate 15 minutes per pound for a rough estimate
Kosher salt and freshly ground black pepper
Preheat oven to 400 °. Arrange the cut vegetables and apple slices in the bottom of a sturdy roasting pan and scatter the fresh herb sprigs over the top.
Place the turkey breast side down on the vegetables as a bed to hold up the turkey and to catch all the delicious drippings for the gravy. Season the turkey with salt and pepper.
Estimate cooking time for your turkey at about 15 minutes per pound. Roast for ½ hour at 400° F, then reduce the heat to 300° F and continue roasting until done. Thirty minutes before the turkey should be done as per your estimate, start taking temperature readings with a meat thermometer, inserted deep into the thickest part of the thigh.
Remove from oven when the dark meat in the thigh registers 170°F. The temperature will continue to increase to 175°F once you remove it from the oven as the heat continues to cook the turkey.
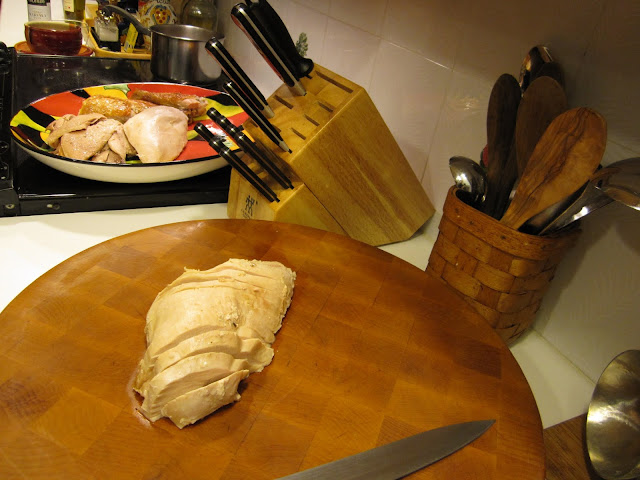
Allow the turkey to rest for 20 to 30 minutes before carving. Turn the turkey breast side up and discard the skin as it will not be crisp.
Carve as desired. I recommend removing each breast half in one piece and slicing crosswise as is illustrated in my photo. Arrange the meat attractively on the platter as this is your showstopping Thanksgiving presentation.
Pour your roasting pan drippings into a large wire strainer set over a large bowl and press down on the warm soft vegetable solids to extract all that flavor and goodness. Skim off as much fat as possible. Use as is, or bring to a boil and thicken using 1 tablespoon cornstarch dissolved in 1/4 water for each 3 cups pan juices - using chicken stock if needed.
5 ounce portion dark meat: Calories 260, fat 10g, carbs 0g, protein 40g
5 ounce portion white meat: Calories 219, fat 4g, carbs 0r, protein 42g
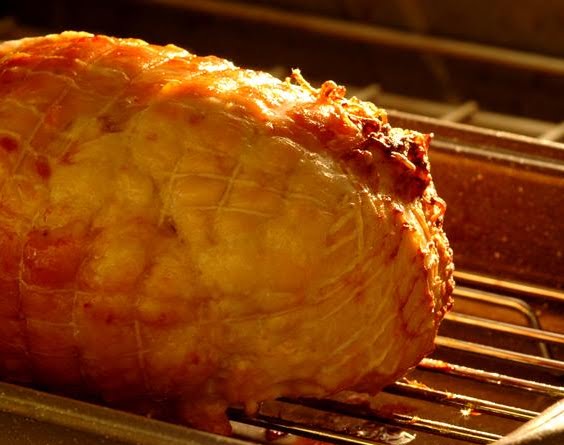
Or if your only wanting to fix a Turkey breast
When I make a special holiday meal for just the two of us, or a small dinner for four – I don’t need a whole turkey. My grocery store sells turkey parts, so I can buy a turkey breast half that weighs about 2½ to 3 pounds, perfect for dinner plus leftovers. Once again, don’t overcook your turkey. A turkey breast should roast until a meat thermometer reads 155° F so it stays moist inside. (the temp will continue to raise to 160° via carryover cooking)
One 2 ½ - to 3-pound boneless turkey breast half, butterflied (either have it boned or do it yourself)
Olive oil
1 teaspoon Bell’s Seasoning, or your favorite prepared poultry blend
1/2 teaspoon garlic powder
Kosher salt and freshly ground black pepper
1 Granny Smith apple, peeled, cored, and very thinly sliced
1/2 medium onion, peeled and very thinly sliced
1 cup chicken broth
If you are boning your own turkey breast half, it is easier to place the meat skin side down on the cutting board and, using the tip of a sharp knife, cut and lift the bones away from the meat. Otherwise, ask the butcher to do it for you and ask for extra string so you can retie it.
Preheat the oven to 325° F.
With the skin side down, lightly coat the meat with olive oil, then sprinkle generously with Bell’s Seasoning, garlic powder, salt, and pepper. Layer half of the apple slices down the center of the roast, and fold up both sides, encasing the apple and seasonings in the center of meat. Tie with cotton kitchen string in several places. Arrange the onion slices in a single layer in the roasting pan and place the roast seam side down on top of the onion slices. Arrange the remaining apple slices around the roast in the pan. Coat the skin with olive oil and season with salt and pepper.
Roast until a meat thermometer inserted into the center of the meat reads 155°F, about 1 hour.
Remove the roast from the pan to a platter and loosely cover with foil. Mash the onion and apple into the pan juices using a fork, adding enough chicken broth to scrape up the bits and create a moist and delicious sauce for the sliced turkey.
Prep Time: 10 minutes
Cook Time: 75 minutes
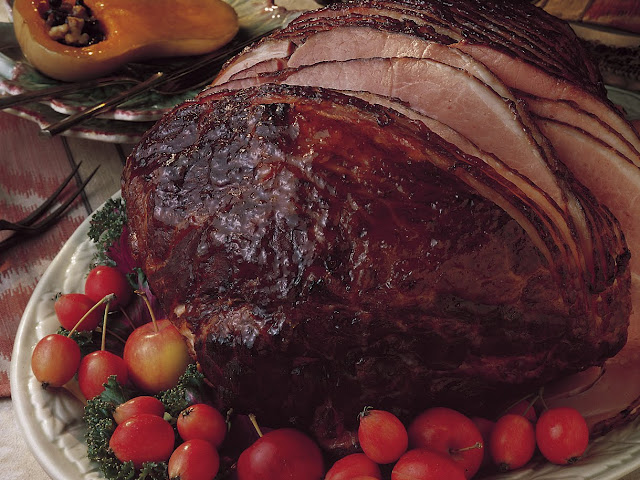
Just an old-fashioned glazed ham with a sweet spiciness that is perfect for your holiday party buffet table. Everyone will love this traditional ham! I like it thick sliced, each piece with a bit of glaze at the edge. The Maple Mustard sauce passed at the table kicks this main dish up at least two notches.
Baked Apricot Glazed Ham
One 4 to 5 pound fully cooked, bone-in, smoked ham
One 10-ounce jar Smucker's Sugar Free Apricot Preserves
2/3 cup orange juice
1 tablespoon red wine vinegar
1/3 cup Grey Poupon Dijon mustard
Whole cloves
Maple Mustard Sauce
1/2 cup Grey Poupon Dijon Mustard
1/4 cup Maple Syrup (use regular or sugar free maple syrup or make a dish of each for your table)
Heat oven to 325.
Blend preserves, orange juice, and vinegar in a small saucepan. Bring mixture to a boil, lower heat to a gentle simmer and reduce until thick enough to coat the back of a spoon.
Remove from heat, and whisk in mustard.
Place ham in a shallow roasting pan, score the surface of ham in a diamond pattern; insert cloves at the cross points and coat with about half of the glaze.
Bake for 15 minutes per pound basting occasionally. While ham is roasting, whisk together Dijon mustard and maple syrup.
Remove from oven and let ham rest for 20 minutes before slicing. Serve with Maple Mustard sauce.

Ingredients:
1 1 can (10 3/4 ounces) Campbell's® Condensed Cream of Mushroom Soup (I used the Healthy Request® version)
1 1/4 cup milk
1 1 teaspoon soy sauce (or substitute salt)
Dash ground black pepper
1 tbsp Garlic Powder
1 tbsp Onion Powder
3 cans cut green beans
¼ cup Greek Yogurt
2 cups shredded cheddar cheese
1 can stems & pieces mushrooms, drained
2/3 cups French's® French Fried Onions (optional, you could substitute slivered almonds)
Directions:
Whisk together the soup, milk, Greek yogurt, soy sauce, black pepper, garlic powder, and onion powder until thoroughly combined. Fold in 1 cup of the cheese, beans, and mushrooms, then pour the mixture into a 3 quart microwave safe (or oven safe) dish. I cook mine in the microwave, so I’m giving both options:
To Microwave: Microwave on high for 5 minutes, then stir. Heat it for an additional minute or so, until the cheese is melted and casserole is completely heated through.
Top with the reserved cup of cheese and fried onions (or slivered almonds) and heat on high for about 2 minutes, until cheese melts and onions get crunchy.
To Bake: Preheat oven to 350°F. Bake for 25 minutes or until the bean mixture is hot and bubbling. Stir the mixture, and then sprinkle with the remaining cup of cheese and the onions (or almonds). Bake for 5 minutes or until the cheese is melted and onions are golden brown.
Serves 8
Get all the creamy, cheesy goodness of mac and cheese—without the high starch content of macaroni. To make your own breadcrumbs, tear firm, fresh bread into pieces and whirl in a food processor or blender until crumbs form.
1 large head cauliflower (1 ½ lb.), cut into medium florets (8 cups)
2 Tbs. butter or margarine
3 Tbs. all-purpose flour
2 cups low-fat milk
1 clove garlic, minced (1 tsp.)
2 cups grated extra-sharp Cheddar cheese
½ cup nutritional yeast
1 pinch cayenne pepper
2 egg yolks
1 ½ cups fresh breadcrumbs
1. Preheat oven to 350°F. Bring large pot of salted water to a boil. Add cauliflower florets, and boil 5 to 7 minutes, or until just tender. Drain, reserving 1 cup cooking liquid, and set aside.
2. Melt butter in same pot over medium heat. Whisk in flour, and cook 1 minute, stirring constantly. Whisk in milk, garlic, and reserved cooking liquid, and cook 7 to 10 minutes, or until sauce is thickened, whisking constantly. Remove from heat, and stir in cheese, nutritional yeast, cayenne pepper, and egg yolks until cheese is melted. Fold in cauliflower.
3. Coat 13- x 9-inch baking dish with cooking spray. Spread cauliflower mixture in baking dish, and sprinkle with breadcrumbs. Spray breadcrumbs with cooking spray. Bake 30 minutes, or until casserole is hot and bubbly and breadcrumbs are crisp and brown.
Prep:15 mins
Cooking:45 mins
Level:Easy
Yields:16
Ingredients
8 medium potatoes (about 2 1/2 to 3 lb. total), peeled and cut into 1-inch chunks
1/2 cup light sour cream
1 teaspoon salt
1/2 teaspoon ground black pepper
2 cups (8-oz. pkg.) shredded 2% cheddar cheese, divided
6 slices turkey bacon, cooked and crumbled,divided
Sliced green onions (optional)
Directions
PLACE potatoes in large saucepan. Cover with water; bring to a boil. Cook over medium-high heat for 15 to 20 minutes or until tender; drain.
PREHEAT oven to 350° F. Grease 2 1/2- to 3-quart casserole dish.
RETURN potatoes to saucepan; add evaporated milk, sour cream, salt and pepper. Beat with hand-held mixer until smooth. Stir in 1 1/2 cups cheese and half of bacon. Spoon mixture into prepared casserole dish.
BAKE for 20 to 25 minutes or until heated through. Top with remaining 1/2 cup cheese, remaining bacon and green onions. Bake for an additional 3 minutes or until cheese is melted.
TIP:
• This casserole can be assembled ahead of time and refrigerated. Cover with foil and bake at 350° F for 40 to 45 minutes or until heated. Uncover; top with cheese, bacon and green onions; bake for an additional 3 minutes or until cheese is melted.
Minutes to Prepare: 10
Minutes to Cook: 40
Number of Servings: 16
Ingredients
1 tblsp light butter
14 oz stuffing bread (such as pepperidge farm
or mrs cubbison)
1/2 cup chopped onion
1/2 cup diced celery
1/2 cup diced carrots
1/2 cup diced musrhoom
2-3 cloves of garlic
2- 2 1/2 cup chicken broth
poultry seasoning to taste ( I usually use 1-2 tsp)
pepper to taste around 1 tsp
Directions
preheat oven to 350 degrees
heat a large saute pan once heated add butter and spray with cooking spray add carrots and saute add celery, onion, garlic and mushroom add additional cooking spray if needed continue cooking until veggies are tender remove from heat transfer to bowl and allow to cool slightly
in a large bowl add bread stuffing and veggies toss together season with pepper and poultry seasoning add chicken broth mixing until moist but not soaking taste and adjust seasoning
spray casserole dish with cooking spray add stuffing mix and cover with foil bake 20-25 minutes uncover and cook additional 10 minutes or until slightly crispy on top
serves around 1/2 cup each serving
Number of Servings: 16
Heart Healthy Recipe, Diabetes friendly & Gluten Free Recipe
Healthy Greek yogurt substitutes for high-fat mayonnaise in this easy deviled eggs recipe. Perfect for brunch, a light lunch or an easy appetizer, these low calorie deviled eggs can be made ahead.
Ingredients
8 large eggs
1/4 tsp salt
1/3 cup nonfat plain Greek yogurt
1 Tbsp Dijon mustard
1 tsp lemon juice
1 Tbsp minced shallot
1/4 tsp hot sauce
Black pepper to taste
1 green onion, chopped, for garnish
Paprika, for garnish
Preparation
In a medium saucepan, cover eggs with cold water. Add 1/8 teaspoon of the salt. Bring to a boil. Remove pan from heat; cover and let stand for 10 minutes. Drain. Run eggs under cold water to cool them. Remove from saucepan with a slotted spoon.
In a medium bowl, mix yogurt, mustard, lemon juice, shallot and hot sauce.
Peel the eggs and halve them lengthwise. Remove the yolks, setting the whites aside, and transfer the yolks to the bowl with the yogurt mixture. Season with pepper and the remaining 1/8 teaspoon salt. Mash yolks with a fork until smooth.
Place yolk mixture in a resealable plastic bag and seal. Snip a 1/4-inch hole in 1 corner of bag. Pipe yolk mixture into the whites. Sprinkle with chopped green onion and paprika just before serving, or cover with plastic wrap and refrigerate for up to 8 hours.
Yield: 8 servings
Prep Time: 20 minutes
Cook Time: 90 minutes
Makes 3 cups
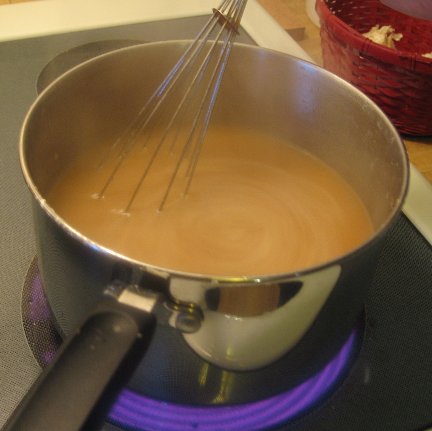
Gravy scares people and it is sad because it doesn’t take a Martha Stewart gene to get it right. While you can buy gravy or gravy mixes, the really good stuff is made from scratch. Think it through, follow this recipe and you will soon be Gravy Queen.
Making superb gravy is all in the stock, the homemade flavorful broth, which you put on the stovetop to simmer when you are preparing your turkey for the oven.
Turkey neck - remove from the bag inside the turkey
2 celery stalks
2 carrots
1 large onion, quartered
Several sprigs fresh thyme
12 whole peppercorns
2 cups chicken broth – Swanson Organic Chicken Broth is excellent
Pan drippings from roasted turkey
2 tablespoons flour
2 tablespoons butter
Place the turkey neck, celery, carrots, onion, thyme, peppercorns, chicken broth and 2 cup water in a medium saucepan, and bring to a boil over medium high heat. Skim any foam that rises to the surface, lower the heat, and simmer 60 to 90 minutes while the turkey is roasting, until the volume is reduced by half and the stock is flavorful. Strain through fine mesh sieve, pressing down on the solids to extract as much liquid as possible.
Once the turkey is done and transferred to a platter to ‘rest’, spoon out and discard as much fat from the roasting pan as you can, and strain the pan drippings into the turkey stock. Mash together the butter and flour into a smooth paste. Whisk enough of the paste into your boiling gravy to bring the gravy to your desired consistency. Season with salt and pepper to taste.
HELP!
How to fix fatty gravy
If the fat is sitting on top of the gravy, then you can skim it off. Try using a spoon, or if that doesn’t work, soaking it up with a piece of bread. If you’ve got time on your hands, let it stand for a while and then float paper towel strips on the gravy, replacing each strip as it gets soaked.
How to fix lumpy gravy
First try to whisk out the lumps with a wire whisk, or pouring it into a mesh strainer while pressing against the lumps with a spoon. Try blending it in the blender.
How to fix salty gravy
If it’s very salty, you have to add liquids to the gravy to dilute the salt. If it’s just a little over salted, you can try adding a pinch of sugar to counteract the flavor, or cooking thin slices of raw potato in the gravy until they’re translucent.
How to fix thin gravy
Making a paste called beurre manié will make your gravy thicker. For every cup of liquid mash together 1 tablespoon of butter and an equal amount of flour into a smooth paste. Whisk the paste into your boiling gravy.
**I think I'm doing pretty good so far. still searching for a good sweet potato casserole and some others will share in a later post. **


+2.jpg)